Hello World Example
How collar.js works ?
Step 1: record your thoughts with collar.js API
Think about the data flow, and how you want to process the data one step after another, and record it with collar.js' API. Thanks to collar.js' declarative API, you don't need to specify implementation here, just the step and some comment string to note the step.
login example
const collar = require('collar.js');

const input = collar.input('login input');
const output = collar.input('login output');

input
  .when('input message is [login]')
  .do('check the user name and password pair')
  .map('create greeting')
  .do('alert [login]')
  .errors('alert errors')
  .to(output);
Step 2: visualize it in dev tool
Enable collar dev tool
const DevToolAddon = require('collar.js-dev-client');
collar.use(new DevToolAddon());
Install & run collar dev server
sudo npm install collar-dev-server && collar-dev-server
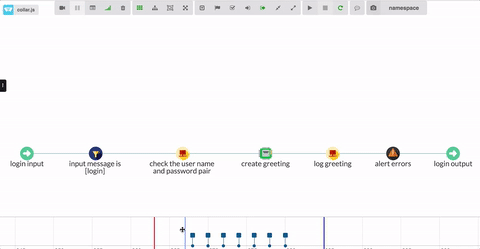
Open browser http://localhost:7500, and run your app. You will see something like this:

The gray labelled nodes are the nodes need to be implemented.
Step 3: implement the gray node in graph
input
  .when('input message is [login]', s => s.get('type') === 'login')
  .do('check the user name and password pair', s => {
    let username = s.get('username');
    let password = s.get('password');

    // check the user name and password pair here
    let match = checkCredential(username, password);
    if (!match) {
      throw new Error('login failed!'); // will be caught directly in 'errors' node
    }
  })
  .map('create greeting', s => {
    let username = s.get('username');
    return s.set('greeting', `Hello! ${username}`);
  })
  .do('alert [login]', s => console.log(s.get('greeting')))
  .errors('alert errors', s => {
    let error = s.error;
    alert(error.message);
  })
  .to(output);
Rerun your app, and check collar dev server on http://localhost:7500, you will have the following graph:

All nodes' label are black now, indicating that they are all implemented.
Step 4: test your flow with collar dev tool
In collar dev tool (http://localhost:7500), click start recording tool bar button, and open send signal dialog, type the following message body in the dialog:
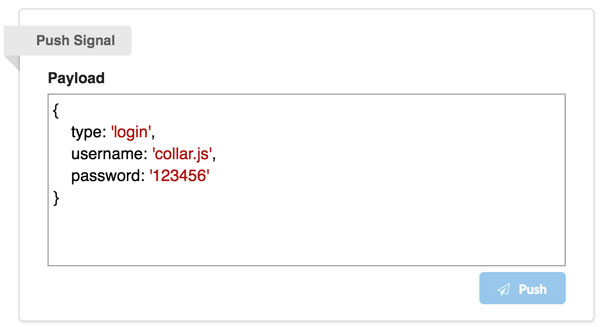
Click the login input node, and click push button to push the signal to the login input node. You will see Hello! collar.js in the console output.
You also can playback the data flow in the time line panel, and see how data flows and evaluates during its propagation.