Build Your First Application
In this tutorial, we will build a simple counter application. It is a single route redux application. A predefined architecture ("redux-single-route-app") can be used to build your application with this architecture:
index.js
import Collux from 'collux';

// create a singe route redux application
var app = Collux.createApp('redux-single-route-app', {});

// run the application
app.run();
Now you have a basic redux single route app. Let's check how it looks like with collar dev tool.
Check the architecture with collar dev tool
Add the following code at the beginning of index.js
import Collux from 'collux';
// add the following two lines
import DevToolAddon from 'collar.js-dev-webclient';
Collux.use(new DevToolAddon());
Now run collar dev server
node node_modules/collar-dev-server/bin/collar-dev-server
or directly run it if you installed collar-dev-server globally
collar-dev-server
Open collar dev tool in browser http://localhost:7500/?perspective=arch&view=hierarchy.td
Next, run your application
npm start
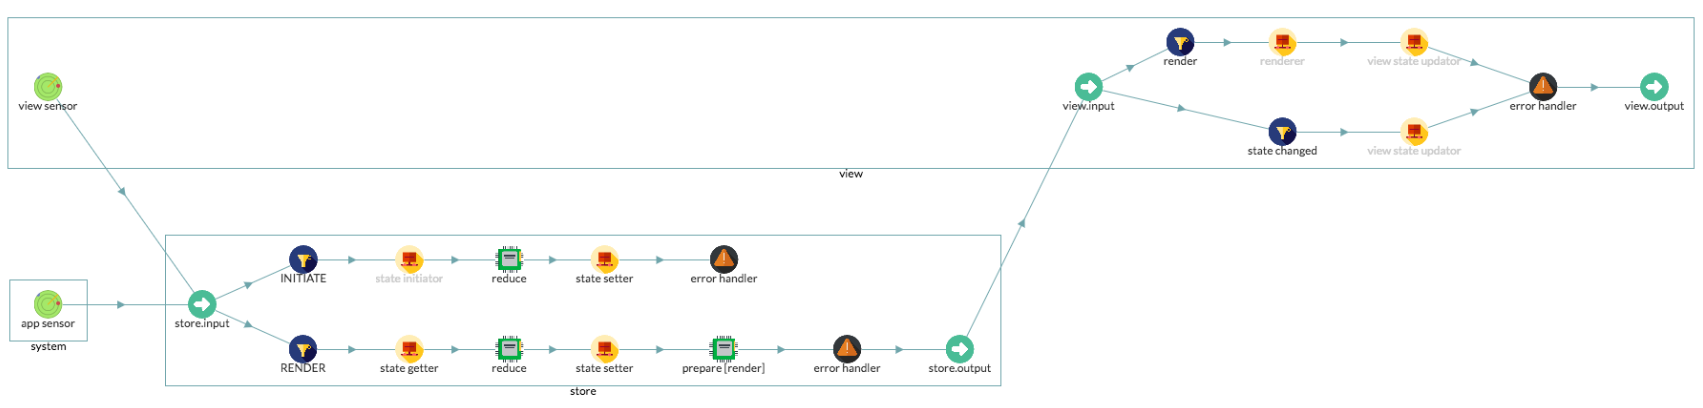
Check dev tool you will see the following diagram:
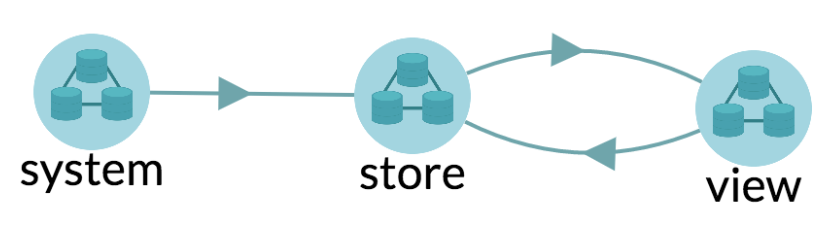
Your application is consist of 3 components: store, view, and system. Store handles Actions and manages the state of your application. It pushes new state to the view. The view can emit actions to change the application state. System component send system level actions to the store.
Right click on the nodes in the diagram, and expand them from the popup menu, you can get the following detail diagram, which shows the data flow of your application:
Setup the application
The code above just helps us build a redux single route architecture. We need to config it to make it work. Let's first create a UI component to show the counter:
class CounterView extends React.Component {
  constructor(props) {
    super(props);
    this.state = {};
  }

  onIncrement() {
    this.props.sensor.send({
      actionType: 'INCREMENT'
    })
  }

  onDecrement() {
    this.props.sensor.send({
      actionType: 'DECREMENT'
    })
  }

  render() {
    return (
      <div>
        <h1>{this.state.value}</h1>
        <button onClick={this.onIncrement.bind(this)}>+</button>
        <button onClick={this.onDecrement.bind(this)}>-</button>
      </div>
    )
  }
}
And add the following options in createApp() function call, to tell our application what is the initial state (by specifying initState), how to render our view (by specifying render), and how to update the view (by specifying updateState).
let counterView = null;
var app = Collux.createApp('redux-single-route-app', {
  initState: () => {  //
    return {value: 1};
  },
  render: () => {
    counterView = ReactDOM.render(
      <CounterView sensor={app.getViewSensor()}/>,
      document.getElementById('counter')
    )
  },
  updateState: (state) => {
    counterView.setState(state);
  }
});
Add reducer
Now it is time to add actions to our counter. Use application's reduce method to add two reducers to handle 'INCREMENT' and 'DECREMENT' actions.
app.reduce('INCREMENT', (prevState, action) => {
  return {value: prevState.value + 1};
});

app.reduce('DECREMENT', (prevState, action) => {
  return {value: prevState.value - 1};
});
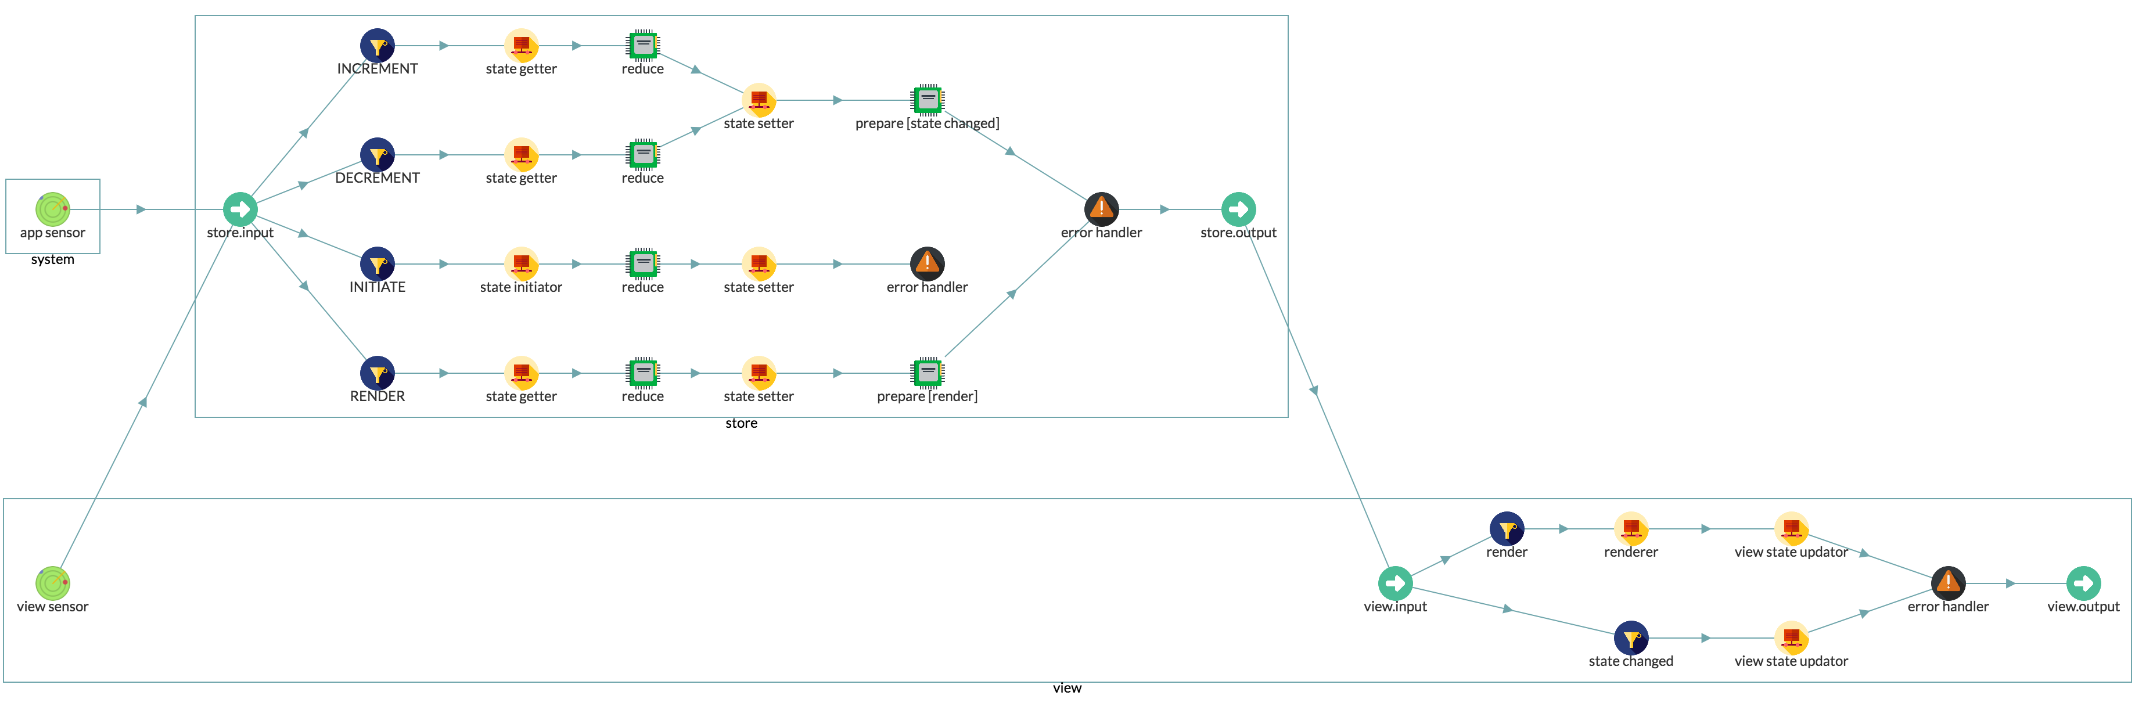
Well done! Your just made your first application, Now run your application again (If you use create-react-app, your app will refresh automatically when you save the file) and check collar dev tool. You will see your application looks like the following diagram:
You can play with your app and collar dev tool to understand how data flows. Start collar-dev-server, open http://localhost:7500, and rerun following codepen:
See the Pen collux-counter-example by Bo HOU (@bhou) on CodePen.